MS Word: Layout Tab's Arrange section panes
- Fakhriddinbek

- Aug 29, 2025
- 4 min read
Updated: Aug 30, 2025
Microsoft Word is widely known for its text editing capabilities, but it’s also a powerful tool for document layout and design. Whether you're creating a brochure, a report with visual elements, or a resume with icons and shapes, knowing how to arrange objects precisely is essential.
The Arrange section in the Layout tab of Microsoft Word gives you control over how images, shapes, text boxes, and other objects are positioned and layered within your document. This article provides a comprehensive guide to the Arrange section, explaining each feature, its use cases, and best practices for creating clean, professional layouts.
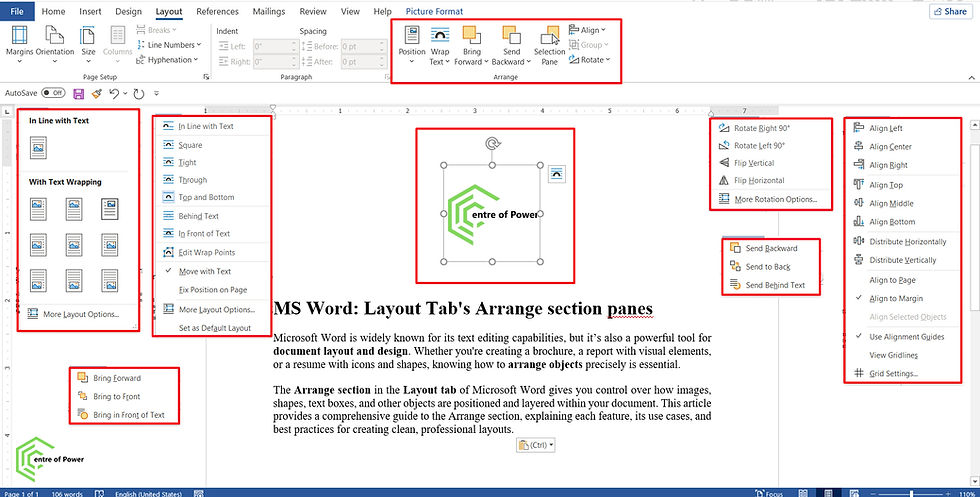
Where to Find MS Word: Layout Tab's Arrange section panes?
To access the Arrange section:
Open your Word document.
Click on the Layout tab in the Ribbon.
Locate the Arrange group—usually positioned at the far right of the tab.
This section becomes active when you select an object such as a picture, shape, icon, or text box. It includes tools for positioning, wrapping, aligning, rotating, and layering objects.
Key Features of the Arrange Section
The Arrange section includes several tools that help you control the layout of non-text elements in your document:
1. Position
Allows you to place the selected object in a predefined location on the page (e.g., top left, center, bottom right).
Use Cases:
Position a company logo in the top-right corner of a letterhead.
Align a photo to the center of a flyer.
2. Wrap Text
Controls how text flows around the selected object. Options include:
In Line with Text
Square
Tight
Through
Top and Bottom
Behind Text
In Front of Text
Use Cases:
Wrap text around a product image in a catalog.
Place a watermark behind text using “Behind Text.”
3. Bring Forward / Send Backward
Controls the layering of objects:
Bring Forward: Moves the object one layer up.
Bring to Front: Places the object above all others.
Send Backward: Moves the object one layer down.
Send to Back: Places the object behind all others.
Use Cases:
Layer shapes and text boxes for visual hierarchy.
Ensure background images don’t cover important content.
4. Selection Pane
Displays a list of all objects in the document and allows you to:
Rename objects
Hide/show objects
Reorder objects
Use Cases:
Manage complex layouts with multiple overlapping elements.
Quickly select hidden or layered objects.
5. Align
Aligns objects relative to the page, margins, or other objects. Options include:
Align Left, Center, Right
Align Top, Middle, Bottom
Distribute Horizontally/Vertically
Use Cases:
Align icons evenly across a resume.
Distribute images evenly in a product sheet.
6. Group / Ungroup
Combines multiple objects into one unit for easier movement and formatting.
Use Cases:
Group a caption with an image so they move together.
Ungroup elements to edit them individually.
7. Rotate
Rotates the selected object. Options include:
Rotate Right 90°
Rotate Left 90°
Flip Vertical
Flip Horizontal
Use Cases:
Flip icons for design symmetry.
Rotate arrows or shapes for diagrams.
Why Use the Arrange Section?
Using the MS Word: Layout Tab's Arrange section panes helps you:
Create professional layouts with precise object placement
Avoid formatting errors caused by manual dragging
Maintain consistency across pages and sections
Design visually appealing documents without external tools
Whether you're working on a business proposal, marketing material, or academic project, these tools give you the control needed to present your content effectively.
Practical Applications Across Document Types
Business Documents
Position logos and headers consistently.
Wrap text around charts and infographics.
Group branding elements for easy reuse.
Academic Projects
Align diagrams and figures with captions.
Rotate and layer shapes for visual explanations.
Use the selection pane to manage complex layouts.
Creative Projects
Design flyers, posters, and newsletters.
Layer text and images for dynamic compositions.
Rotate and flip icons for visual balance.
Technical Manuals
Align flowcharts and process diagrams.
Group labels with illustrations.
Use wrap text to integrate visuals with instructions.
Best Practices for Using Arrange Tools
Use the Selection Pane for Complex LayoutsIt’s easier to manage multiple objects when you can see and rename them.
Group Related ElementsGrouping ensures that captions, icons, and shapes stay together when moved.
Avoid Manual AlignmentUse the Align tool for pixel-perfect positioning.
Use Wrap Text StrategicallyChoose the right wrapping style to maintain readability and flow.
Preview Before PrintingAlways check how layered and wrapped elements appear in print layout.
Frequently Asked Questions
Q: Why can’t I see the Arrange section?
It only becomes active when an object (e.g., image, shape, text box) is selected.
Q: Can I use Arrange tools with tables or plain text?
No. These tools are designed for objects like images, shapes, and text boxes.
Q: What’s the difference between “In Line with Text” and “Behind Text”?“
In Line with Text” treats the object like a character in a paragraph. “Behind Text” places it behind all text, useful for watermarks or backgrounds.
Q: Can I align objects to margins instead of the page?
Yes. Use the Align options and choose “Align to Margin” from the dropdown.
Q: How do I rotate a shape to a custom angle?
Use the Rotate handle on the object or go to Format > Size > Rotation for precise control.
Advanced Tips for Power Users
Use Gridlines and Snap to Grid: Enable these from the View tab for precise placement.
Combine with Styles and Themes: Maintain visual consistency across documents.
Use Alt + Drag: For fine-tuned object movement.
Create Templates: Save grouped and arranged elements for reuse.
Ready to Design Like a Pro?
If this guide helped you, there’s more waiting for you at CentreOfPower.com. We’re here to help you master digital tools and unlock your full potential.
Subscribe to our newsletter for weekly tips and tutorial
Bookmark this page for quick reference
Share this article with your team or classmates
Explore our Microsoft Word tags for more guides like this


Comments