MS Word: Layout Tab, Mastering the Paragraph Section
- Fakhriddinbek

- Aug 29, 2025
- 4 min read
Updated: Aug 30, 2025
Microsoft Word is a cornerstone of modern document creation, used by professionals, students, and organizations worldwide. While most users are familiar with basic formatting tools found in the Home tab, fewer explore the powerful controls available in the Layout tab, particularly the Paragraph section.
This article provides a comprehensive guide to the Paragraph section in the Layout tab, explaining its features, use cases, and best practices for creating clean, professional documents. Whether you're formatting a business report, academic paper, or creative manuscript, mastering these tools will elevate your workflow.

Where to Find the MS Word: Layout Tab, Mastering the Paragraph Section
To access the Paragraph section in Microsoft Word:
Open your document.
Click on the Layout tab in the Ribbon.
Locate the Paragraph group, typically positioned between “Page Setup” and “Arrange.”
This section offers precise control over indentation and spacing, allowing you to fine-tune the layout of your paragraphs beyond what’s available in the Home tab.
Indentation: Structuring Text Horizontally
Indentation determines how far your text is offset from the left or right margins. It’s essential for creating structured, readable documents.
Left Indent
Moves the entire paragraph inward from the left margin.
Use Cases:
Indent body text to distinguish it from headings.
Create nested bullet points or numbered lists.
Format block quotes in reports or essays.
Right Indent
Moves the paragraph inward from the right margin.
Use Cases:
Create space for side notes or comments.
Align text with visual elements like images or tables.
Special Indents (via Paragraph Dialog)
Accessible by clicking the small arrow in the bottom-right corner of the Paragraph group.
First Line Indent: Indents only the first line of a paragraph.
Hanging Indent: Indents all lines except the first—commonly used in bibliographies and reference lists.
Use Cases:
Format citations in APA, MLA, or Chicago style.
Create visually distinct paragraphs in creative writing.
Spacing: Managing Vertical Flow
Spacing controls the vertical distance between paragraphs and lines, which directly affects readability and visual hierarchy.
Before Spacing
Adds space above the paragraph.
Use Cases:
Separate headings from body text.
Create visual breaks between sections.
After Spacing
Adds space below the paragraph.
Use Cases:
Improve readability by avoiding cramped text.
Maintain consistent spacing between paragraphs.
Line Spacing (via Paragraph Dialog)
Controls the space between lines within a paragraph. Options include:
Single
1.5 lines
Double
Exactly (custom point value)
Multiple (e.g., 1.15x)
Use Cases:
Format academic papers with double spacing.
Use single or 1.15 spacing for business documents.
Apply exact spacing for design consistency in print layouts.
Why Use the Layout Tab for Paragraph Formatting?
While the Home tab offers basic paragraph tools (alignment, bullets, line spacing presets), the MS Word: Layout Tab, Mastering the Paragraph Section provides precision formatting. Here’s why it matters:
Exact Control: Adjust spacing and indentation in point values for pixel-perfect layout.
Consistency: Apply uniform formatting across sections or entire documents.
Professionalism: Avoid manual spacing with Enter or Tab keys, which can lead to inconsistent formatting.
Efficiency: Format multiple paragraphs quickly using selection and batch formatting.
Practical Applications Across Document Types
Business Documents
Use left indents to highlight key points.
Apply spacing before and after paragraphs to separate sections.
Combine with Styles for consistent formatting across reports.
Academic Writing
Use hanging indents for reference lists.
Apply double line spacing for essays and theses.
Use spacing controls to meet formatting guidelines without manual line breaks.
Creative Writing
Use first-line indents for narrative paragraphs.
Adjust spacing to create rhythm and visual flow.
Combine with font and style settings for aesthetic control.
Legal & Technical Documents
Use exact spacing for compliance with formatting standards.
Apply right indents for annotations or side notes.
Use paragraph dialog for granular control over layout.
Best Practices for Using Paragraph Settings
Avoid Manual Spacing: Don’t use multiple Enter or Tab presses—use Layout tab settings instead.
Use Styles: Save paragraph formatting as a style to apply it consistently across your document.
Preview Changes: Use the live preview feature to see how spacing and indentation affect layout before applying.
Combine with Page Setup: Coordinate paragraph spacing with margins and page breaks for optimal layout.
Use the Paragraph Dialog Box: For advanced formatting, click the launcher icon in the Paragraph group to access all options.
Frequently Asked Questions
Q: Can I apply Layout tab settings to multiple paragraphs at once?
Yes. Select the desired text and adjust indentation or spacing in the Layout tab.
Q: What’s the difference between Layout and Home tab paragraph settings?
The Home tab offers visual formatting (alignment, bullets), while the Layout tab provides precise control over spacing and indentation.
Q: Can I save custom paragraph settings for future use?
Absolutely. Use the Styles feature to save and reuse formatting across documents.
Q: Why does my spacing look different when printing?
Ensure consistent line spacing and margins. Check printer settings and preview before printing.
Q: How do I remove unwanted spacing between paragraphs?
Select the paragraph and set “Before” and “After” spacing to 0 pt in the Layout tab or Paragraph dialog.
Productivity Gains from Using Paragraph Controls
Let’s say manual formatting takes 30 minutes per document. Using Layout tab settings, you can reduce that to 10 minutes. That’s 20 minutes saved per document, or over 80 hours a year if you format 2 documents per week.
That’s two full workweeks saved—just by formatting smarter.
Advanced Tips for Power Users
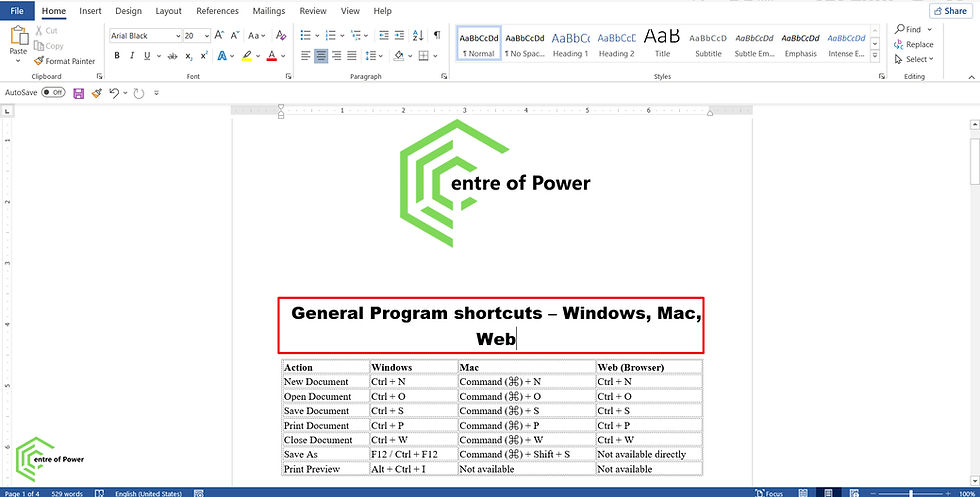
Use keyboard shortcuts: Ctrl + M for left indent, Ctrl + T for hanging indent.
Combine with Section Breaks: Apply different paragraph settings to different sections.
Use Exact Line Spacing: For print layouts, use “Exactly” to control spacing in points.
Apply to Styles: Modify built-in styles (e.g., Normal, Heading 1) to include custom paragraph settings.
Ready to Format Like a Pro?
If this guide helped you, there’s more waiting for you at CentreOfPower.com. We’re here to help you master digital tools and unlock your full potential.
Bookmark this page for quick reference
Share this article with your team or classmates
Explore our Microsoft Word tags for more guides like this


Comments