MS Word: Illustrations Group in the Insert Tab to Work with Screenshots
- Fakhriddinbek

- May 25, 2025
- 3 min read
In today’s digital documentation, the ability to quickly capture and insert screenshots is essential—whether you're writing instructions, creating reports, or sharing visual evidence. Microsoft Word simplifies this process with the Screenshot tool found in the Illustrations
Where to Find the Screenshot Tool in Word
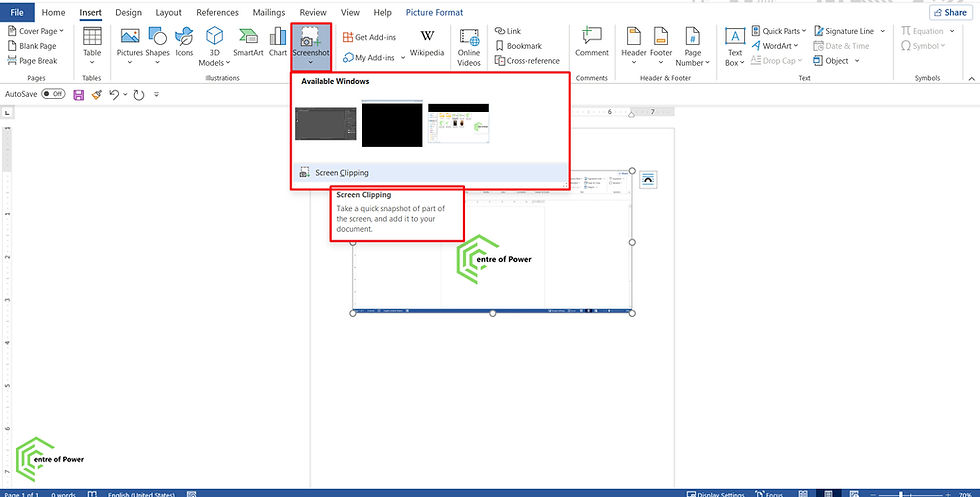
To use the Screenshot feature in Word:
Open your document in Microsoft Word.
Go to the Insert tab on the ribbon.
Locate the Illustrations Group.
Click on Screenshot.
You’ll see two main options:
Available Windows: A list of currently open application windows.
Screen Clipping: Lets you manually select a portion of your screen.
Using Available Windows
If you want to insert an image of a full open window (like a browser or file explorer):
Ensure the target window is open but not minimized.
Click Insert → Screenshot.
Under Available Windows, click the window you want to capture.
The screenshot will be immediately inserted into your Word document.
Tip: Only windows that are not minimized appear in the Available Windows list. Minimized windows need to be restored to be available.
Using Screen Clipping
For more control over what you capture:
Click Insert → Screenshot → Screen Clipping.
Word will minimize temporarily, and your screen will become frosted.
Your cursor will change to a crosshair. Click and drag to select the area you want to capture.
Release the mouse, and your selected screenshot will be inserted into Word.
Use Case Examples:
Capture only part of a chart or image
Snip a section from a webpage
Grab a toolbar or UI element from an application
Formatting Your Screenshot
Once inserted, screenshots behave like images in Word. You can format them using the Picture Format Tab, which appears automatically when a screenshot is selected.
Key Features in the Picture Format Tab:
Feature | Description |
Remove Background | Automatically removes background areas (manually adjustable) |
Corrections | Adjust brightness, contrast, and sharpness |
Color | Apply color filters like grayscale or washout |
Artistic Effects | Add stylized filters such as sketch, blur, or glow |
Picture Styles | Add borders, drop shadows, reflections, or bevels |
Crop | Trim edges or fit images to a certain size |
Align & Position | Adjust layout and wrapping around text |
Alt Text | Add accessibility metadata for screen readers |
Pro Tip: Use Crop → Aspect Ratio to maintain consistency when formatting multiple screenshots.
Saving and Reusing Screenshots
To reuse a screenshot outside of Word:
Right-click on the image.
Select Save as Picture.
Choose the desired file format (e.g., .png, .jpeg, .bmp).
Common Issues and Solutions
“Screenshot option is greyed out”
Solution: Ensure a document is open and active. Also, make sure the Word window is not in the background when using screen clipping.
“My target window doesn’t appear under Available Windows”
Solution: Restore the minimized window first. Only open and visible windows are detected.
“Screen clipping captures the wrong screen or window”
Solution: Organize windows on your desktop before launching the clipping tool. Word minimizes itself automatically, so prepare your layout in advance.
Best Practices for Using Screenshots in Word
Label screenshots with captions or numbered references.
Use consistent image sizes for a professional layout.
Avoid low-resolution content—screenshots scale best when captured at full size.
Include alt text for accessibility compliance.
Crop unnecessary parts to focus attention.
Real-World Applications
Use Case | Screenshot Strategy |
Instruction manuals | Combine screen clippings with numbered steps |
Project documentation | Use full-window screenshots of tools or dashboards |
Technical reports | Capture graphs or UI panels for clarity |
Error reporting | Show software bugs or system messages with exact visuals |
Conclusion
The Screenshot tool in Microsoft Word’s Insert Tab → Illustrations Group is a powerful feature that saves time and enhances clarity by letting you visually capture and insert portions of your screen. Whether you're documenting workflows, creating tutorials, or sharing visual proof, screenshots help communicate faster and more effectively.
With flexible formatting options, built-in cropping tools, and accessibility features, Word provides everything you need to manage visuals professionally—right from within your document.


Comments