PowerPoint: A Deep Dive into the Interface
- Fakhriddinbek

- Sep 15, 2025
- 7 min read
Updated: Sep 20, 2025
PowerPoint: A Deep Dive into the Interface, the ubiquitous tool for bringing ideas to life, whether you’re a student presenting a final project, a CEO delivering a quarterly report, or a creative showcasing a portfolio. But beyond the simple click-and-type, lies a powerful and often underutilized interface. This comprehensive guide will take you on a journey through the heart of PowerPoint, empowering you to create stunning, professional presentations with ease. We’ll break down the core components of the interface, from the intuitive Ribbons and Tabs to the specialized Groups and Views, ensuring you can navigate with confidence and unlock your full creative potential.
The Grand Blueprint: A Ribbon of Possibilities
At the very top of your PowerPoint window, you’ll find the Ribbon. Think of the Ribbon as the central command center, a dynamic toolbar that changes based on what you’re doing. It's designed to keep the most commonly used features front and center, eliminating the need to hunt through endless menus. The Ribbon is the cornerstone of the modern Microsoft Office interface, and understanding its structure is the first step to mastering the program.
The Ribbon is not a single, monolithic entity; it’s organized into a series of logical Tabs. Each Tab represents a major category of tasks. Let's take a closer look at the most essential ones and the ones which exists in standard PPT interface:
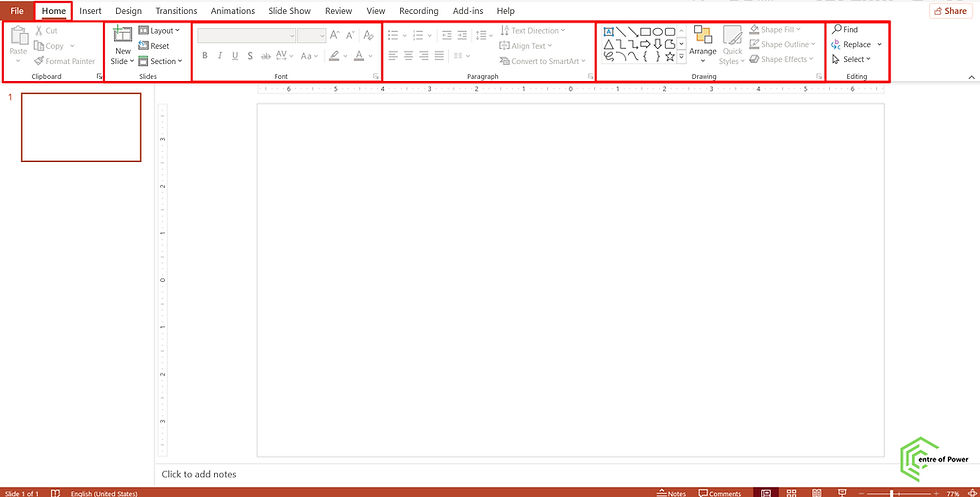
Home: Your go-to for everyday tasks. This is where you’ll spend most of your time. The Home tab is a treasure trove of fundamental tools for formatting text, managing slides, and adding basic shapes. It’s like the Swiss Army knife of PowerPoint.
Clipboard Group: Cut, Copy, Paste. The classics. Did you know you can also use the Format Painter here to quickly apply the formatting of one object to another? A massive time-saver!
Slides Group: New Slide, Layout, Reset, Section. This is where you structure your presentation. The "New Slide" button isn’t just a single option; it offers a dropdown of various pre-built layouts to fit your content, whether it’s a title slide, a two-column comparison, or a picture with a caption.
Font Group: Bold, Italic, Underline, Font Type, Size, Color. All the familiar tools to make your text pop. Don't underestimate the power of a well-chosen font!
Paragraph Group: Align text (left, right, center, justify), Bullets and Numbering, Indentation. These tools are crucial for creating a clean, easy-to-read layout.
Drawing Group: Shapes, Arrange, Quick Styles, Shape Fill, Shape Outline, Shape Effects. This is where you add visual elements. The "Shapes" menu offers a vast library of geometric, block, and flow-chart shapes to help you visualize your data or ideas.
Editing Group: Find, Replace, Select. These are your search and replace tools, especially useful for long presentations where you need to change a specific word or phrase across multiple slides.

Insert: This is where you add new elements to your slides. The Insert tab is all about enrichment.
Tables: Create structured data displays.
Illustrations: Pictures, Shapes, Icons, SmartArt, Charts. This is where the magic happens! Icons are particularly useful for adding modern, simple visuals. SmartArt graphics allow you to turn text into professional-looking diagrams like flowcharts, relationship maps, and hierarchies.
Add-ins: Explore a world of third-party tools to enhance your presentation, from interactive quizzes to survey forms.
Comments: Collaborate with your team by leaving feedback directly on the slide.
Text: Add a Text Box, Header & Footer, WordArt, Date & Time, Slide Number.
Symbols: Insert equations or special characters.
Media: Add Video, Audio, or even Screen Recordings to make your presentation truly dynamic and engaging.

Design: The creative heart of your presentation. The Design tab is where you define the overall look and feel.
Themes: Choose from a gallery of professionally designed templates. A theme is more than just a background; it’s a complete set of colors, fonts, and effects that create a cohesive visual identity for your entire presentation.
Variants: Customize the colors, fonts, effects, and background styles of your chosen theme. This allows for endless customization without starting from scratch.
Customize: Use the "Slide Size" and "Format Background" options to get granular with your design. Need a widescreen presentation for a modern monitor? Adjust it here. Want to add a custom background image or color? This is the place.

Transitions: The "wow" factor between slides.
Transition to This Slide: Choose from a variety of visual effects that play when you move from one slide to the next. From a subtle Fade to a dramatic Morph, transitions can guide your audience's eye and add a touch of professionalism.
Timing: Control how the transition happens—on mouse click or automatically after a certain amount of time. You can also apply it to all slides with a single click.

Animations: Bring individual objects to life.
Animation Group: Apply effects to text, pictures, and shapes. The three types of animations are Entrance (how an object appears), Emphasis (what it does while on the slide), and Exit (how it disappears).
Advanced Animation: The Animation Pane is your control center for managing complex animation sequences, allowing you to set the order, timing, and even trigger animations on a mouse click or a specific event.

Slide Show: This tab is dedicated to the presentation experience itself.
Start Slide Show: From the Beginning, From Current Slide, Present Online. This is how you run your final presentation.
Set Up Slide Show: Control the show type, whether it’s a full-screen presentation or a self-running kiosk. You can also hide specific slides.
Rehearse Timings: Practice your delivery and record the time you spend on each slide, ensuring a smooth and timely presentation.

Review: Collaborate and refine your content.
Proofing: Spell Check, Thesaurus. Don't let a typo ruin your credibility!
Accessibility: Check your presentation for accessibility issues to ensure it can be easily understood by everyone, including those with disabilities.
Comments: View, edit, and manage comments from your collaborators.

View: Change your perspective. The View tab offers different ways to look at your presentation, each with a specific purpose. This is a crucial tab for large or complex decks.
PowerPoint: A Deep Dive into the Interface Views
Understanding the different views in PowerPoint is a game-changer for productivity. Each view is optimized for a specific task.

Normal View (The Default): The workhorse. This is the main editing view, with the Slide Pane on the left (showing thumbnails of all your slides), the main Slide Area in the center (where you edit the current slide), and the Notes Pane at the bottom (for speaker notes).

Outline View: Focus on your content, not the design. This view shows a text-based outline of your slides. It's excellent for structuring your thoughts, checking the flow of your arguments, and quickly reorganizing the order of your topics.

Slide Sorter View: Get a bird's-eye view of your entire presentation. This view displays all your slides as thumbnails, making it easy to rearrange slides, delete them, or hide them with a simple drag-and-drop. It’s perfect for the final stages of organization.

Notes Page View: Prepare your speaker notes. This view shows each slide with its corresponding notes page, allowing you to fine-tune your script and ensure you have all the information you need for your delivery.

Reading View: A preview of your presentation without going into full-screen mode. This is a great way to check your transitions and animations quickly.

Slide Master View: The ultimate control. This view allows you to edit the master slide, which controls the font, colors, backgrounds, and placeholders for all slides in the presentation. Changes made here are automatically applied to every slide based on that master. This ensures consistency and saves you from repetitive manual formatting.
Unlock Your Full Potential
Now that you have a comprehensive understanding of the PowerPoint interface, it's time to put this knowledge into practice. Don't just click randomly; use this guide as your roadmap.
Challenge yourself: Try to create a new presentation using only the keyboard shortcuts you can find for common commands.
Collaborate: Use the Review tab to share your presentation with a colleague and get their feedback.
Experiment: Dive into the Animations and Transitions tabs. Don't be afraid to try out different effects to see what works best for your content.
Take control: Create your own custom theme using the Design tab to reflect your personal brand or company identity.
PowerPoint is more than just a tool; it's a platform for storytelling. By mastering its interface, you’re not just creating slides—you're crafting a narrative that captivates and persuades.
Ready to transform your presentations? Start your journey today and become a PowerPoint master!


Comments