MS Word: Tables Group in the Insert Tab to insert tables
- Fakhriddinbek

- May 12, 2025
- 3 min read
Updated: May 25, 2025
Inserting Tables: The Insert Tab → Tables Group
The process begins in the Insert tab of Microsoft Word:

Insert → Table
Location: Insert Tab → Tables Group
How to Use:
Click the Table dropdown.
Choose from several options:
Grid: Hover over the squares to select the desired number of rows and columns.
Insert Table: Opens a dialog box to input exact numbers.
Draw Table: Lets you manually draw cells — useful for custom layouts.
Convert Text to Table: Transforms delimited text into a structured table.
Quick Tables: Built-in templates for calendars, matrices, and more.
Use Case: Quickly structure information such as pricing tables, schedules, and comparison charts.
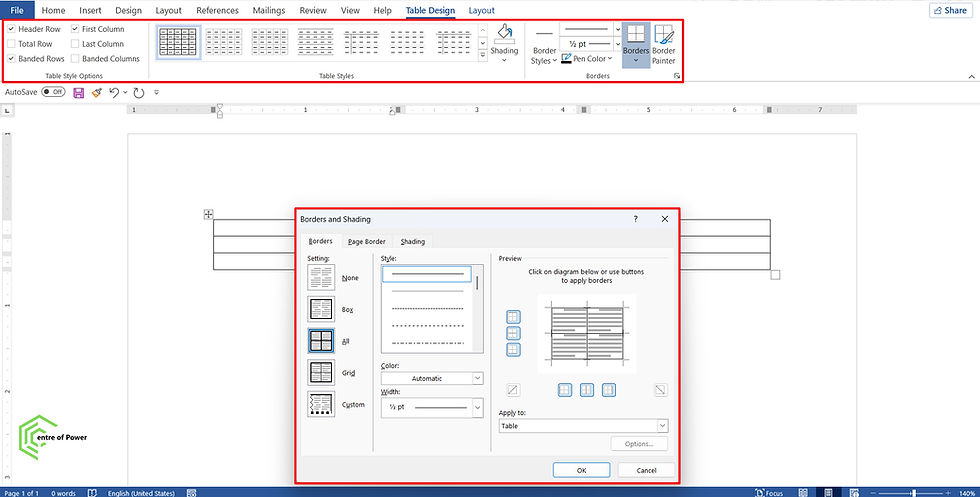
Table Design Tab: Formatting Your Table
After inserting a table, two new contextual tabs appear at the top of the Ribbon: Table Design and Layout (visible when the table is selected).
Table Design Tab
Purpose: Focuses on visual formatting and style.
Main Features:
Feature | Description |
Table Styles | A gallery of pre-designed color schemes and borders. |
Shading | Apply background colors to selected cells. |
Borders | Add or remove specific borders around cells or entire tables. |
Effects | Add special styles such as shadows or reflections. |
Header Row / Banded Rows / First Column / Last Column | Formatting options to make headers stand out or alternate row colors for readability. |
Best Practice: Use Banded Rows to improve readability in data-heavy tables.
Layout Tab: Managing Table Structure and Content

Table Layout Tab
Purpose: Controls table structure, cell alignment, and size.
Main Features:
Feature | Description |
Insert Above / Below / Left / Right | Adds rows or columns to the table. |
Delete | Removes selected rows, columns, or the entire table. |
Merge Cells / Split Cells | Combines or divides cells to customize layout. |
Distribute Rows/Columns | Ensures even sizing of table rows and columns. |
Cell Margins / Alignment | Controls text positioning inside cells. |
Text Direction | Rotates text vertically or diagonally. |
Sort | Sorts table content alphabetically or numerically. |
Repeat Header Rows | Ensures headers reappear at the top of each page in long tables. |
Convert to Text | Transforms a table back into plain text. |
Keyboard Tip: Use Tab to move to the next cell and Shift + Tab to move backward.
Real-World Use Cases
Scenario | Tool | Why It’s Useful |
Creating a pricing comparison chart | Table + Table Design | Provides clear, structured layout |
Formatting a class schedule | Quick Tables + Layout | Uses prebuilt designs, easy editing |
Sorting employee names alphabetically | Layout → Sort | Alphabetizes without manual effort |
Building custom grids for planning | Draw Table | Enables precise cell placement |
Best Practices for Working with Tables in Word
Use Header Rows for tables longer than one page.
Apply Table Styles for consistent branding.
Use Shading and Borders sparingly to avoid visual clutter.
Always use Convert Text to Table when working with CSV-style data.
Save time by creating and reusing Quick Tables for repetitive formats.
Troubleshooting Tips
Issue | Solution |
Table doesn’t fit the page | Use AutoFit under Layout → AutoFit Contents or Window |
Header row not repeating | Select the row → Layout → Repeat Header Rows |
Uneven columns | Use Distribute Columns under Layout |
Difficult to format borders | Use Borders and Shading dialog for precise control |
Conclusion
The Tables group in the Insert tab, along with the Table Design and Layout tabs, gives Microsoft Word users complete control over table creation, appearance, and structure. These features are not just for making documents look nice — they improve readability, enhance professionalism, and make data easier to digest. Whether you're drafting a financial report, lesson plan, or marketing brochure, mastering tables in Word is a must-have skill.


Comments